

Recently, I got ahold of a Japanese Sega Master System. Yes, the one with FM sound, rapid-fire, and 3-D glasses support built-in. It is the ultimate SMS configuration! However, I have only a few Japanese games for it, and I wanted to play US SMS games on my Japanese machine to make use of their hidden FM sound capabilities. Since the cartridges are incompatible, and since US->JP adaptors are seemingly impossible to find in this day and age, I decided to make one myself. Watch out!!! It's homemade adaptor time!
I used as parts:
First I opened up the Master Gear and cut the wires very close to the GG connector. There are 37 wires in total on this thing. (Unfortunately, they are connected very weakly to the SMS connector PCB, so a few wires fell off when I was bending/contorting them. But I soldered them back on.) The wires are bundled in packs of 12, with one extra. I separated all the wires from the bundles, just so that they would be easier to manipulate. But before I did that, I drew some diagonal lines with a magic marker across the wire bundles. This is a simple way to make sure they are in order when I soldered them to the MkIII PCB. Ah, I also labeled which was the FRONT and which was the BACK of the SMS connector with a pencil, just to be safe.
Anyway, from the front of the SMS connector, from left-to-right, here is how those 37 wires connect to the SMS connector:
| Wire # | 1 |
2 |
3 |
4 |
5 |
6 |
7 |
8 |
9 |
10 |
11 |
12 |
1 |
2 |
3 |
4 |
5 |
6 |
7 |
8 |
9 |
10 |
11 |
12 |
1 |
1 |
2 |
3 |
4 |
5 |
6 |
7 |
8 |
9 |
10 |
11 |
12 |
| SMS Conn. # | 46 |
47 |
39 |
37 |
35 |
36 |
33 |
31 |
32 |
29 |
30 |
27 |
28 |
25 |
26 |
23 |
24 |
21 |
22 |
19 |
20 |
17 |
18 |
15 |
16 |
13 |
14 |
11 |
12 |
9 |
10 |
7 |
8 |
5 |
6 |
4 |
2 |
| Pin Name | /R e s. |
C |
R |
M1 | +5V | A15 | A12 | A6 | A7 | A4 | A5 | A2 | A3 | A0 | A1 | D1 | D0 | GND | D2 | GND | GND | D4 | D3 | D6 | D5 | /C r t O e |
D7 | /M |
A10 | A9 | A11 | A13 | A8 | /M 8 - B |
A14 | RD | WR |
So then, I opened up my Card Catcher and ripped off the card connector. I then desoldered all the pins and made sure the solder holes left behind were empty. And I started orienting the SMS connector with the Card Catcher's pinholes. I discovered - to my delight - that if I matched the BACK of the SMS connector with the FRONT of the card catcher, the wires from the Master Gear's SMS connector correspond almost perfectly with the pinholes! It's like these things were made for each other. (Well, actually, I guess it's because the pin arrangement of the MyCard is very similar to that of the Game Gear...) So, for most of the wires, all I had to do was solder them in one after another, in the vacant pinholes, usually in a zigzag (or triangular) fashion (since the pinholes on the Card Catcher are also in a zigzag configuration. Of course, some wires had to be rerouted to a different hole, and of course, some wires didn't have a corresponding hole, so they were left unconnected.
Remember that in this pic, we are looking at the Card Catcher's
FRONT but the SMS connector's BACK!
There are several SMS pins that don't have a corresponding function on the Japanese MkIII, so I was a little worried about games not working. And of course, my knowledge of SMS hardware is low. So, I copied the wiring diagrams that some Japanese guy made of his SMS->MkIII adaptor. He labeled the SMS and MkIII connectors all wrong, though, which was very confusing. The wiring was correct, but the pin numbering was not what the cartridges use as standard (MkIII: B1-B22 FRONT /A1-A22 BACK; SMS: 2-50 FRONT /1-49 BACK)
Here is how the MkIII pins were connected (and how they should be connected if possible) on the original SMS->MkIII adaptor.
| B (FRONT) |
MkIII Pin: |
B1 |
B2 |
B3 |
B4 |
B5 |
B6 |
B7 |
B8 |
B9 |
B10 |
B11 |
B12 |
B13 |
B14 |
B15 |
B16 |
B17 |
B18 |
B19 |
B20 |
B21 |
B22 |
|
Connect to SMS Pin: |
1, 35, 46, 34 |
5 |
4 |
2 |
3 |
13 |
6 |
11, 36 |
20, 19, 21 |
||||||||||||||
Label |
+5V | +5V | /CS | /M 8 - B |
RD | WR | I/O |
I/O WR |
M |
/C r t O e |
/C O N T |
/R |
/C A S 0 |
C A 7 |
/R A S 1 |
/C A S 1 |
/R C S E L |
A14 | A15 | GND | GND |
| A (BACK) | MkIII Pin: |
A22 |
A21 |
A20 |
A19 |
A18 |
A17 |
A16 |
A15 |
A14 |
A13 |
A12 |
A11 |
A10 |
A9 |
A8 |
A7 |
A6 |
A5 |
A4 |
A3 |
A2 |
A1 |
| Connect to SMS Pin: |
14 |
15 |
16 |
17 |
18 |
22 |
23 |
24 |
7 |
33 |
10 |
12 |
9 |
8 |
32 |
31 |
30 |
29 |
28 |
27 |
26 |
25 |
|
Label |
D7 | D6 | D5 | D4 | D3 | D2 | D1 | D0 | A13 | A12 | A11 | A10 | A9 | A8 | A7 | A6 | A5 | A4 | A3 | A2 | A1 | A0 |
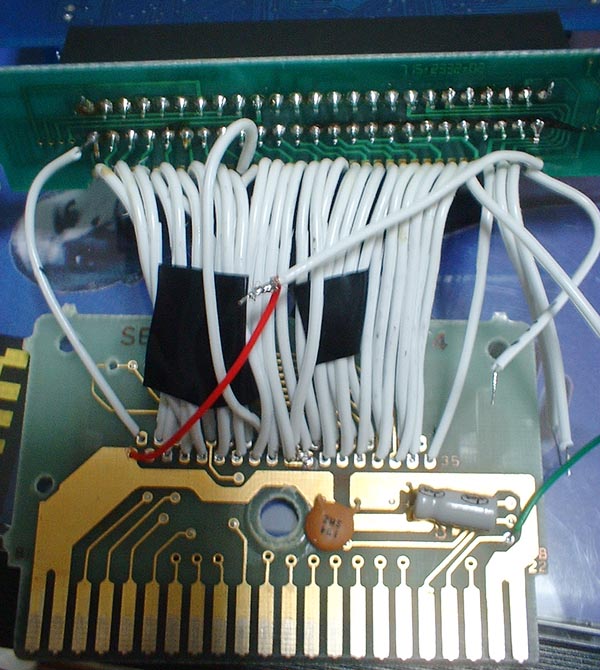
This is just a connection diagram between the SMS' and the Mark III's cartridge connectors. So you'll still have to trace the wires from the Card Catcher's edge to the proper pinhole on the Card Catcher. But when you do, you'll notice that the wires from the Master Gear line up well enough with the required pinhole on the CC. Some lines have to be rerouted; for example, A(ddress line)15 needs(?) two connections on the SMS, so I wired one to the pinhole, and another to a contact point on the same line (B19 of the CC). You can see this in the above picture with the green wire. Also, there are 3 GND connections, but only 2 pinholes, so I doubled up two wires into the same hole. No problem there. Finally, the MarkIII has no RESET line, so I've soldered the SMS' RESET to +5V, as seen with the red wire in the above pic. (Actually, I tested the adaptor without the connection between RESET and +5V and it still worked fine.)
And so plugging in a US SMS cartridge and turning on
my Japanese SMS system yields...
SUCCESS!

OK, so I was lucky this time... It worked on the first try! Now I can play my US games (and my ulterior motive: my flash cartridge) on this great system. I've tested several games (not every one, mind you, but a dozen or so) and they seem to work nicely with this adaptor. I'm sure that some games that require the SMS Cartridge pins that the Mark III doesn't have (Reset, NMI, IRQ, etc...) won't work on this system. Most likely, Codemasters games and the Action Replay won't work. If you try making this adaptor yourself, remember that it is flimsy, and your mileage may vary.
And a bonus tidbit: Now that I can try out some 3-D games on this SMS, I've discovered that the SMS 3-D glasses work identically to the Famicom's 3-D glasses. I don't have a pair of Sega glasses, but I did have my trusty Fami glasses sitting here, so I plugged them into the SMS and they worked just fine!
I hope this was useful to you. Thanks very much to Charles MacDonald, Eric Quinn, and other people at SMS Power!